实现内网穿透并使用Windows远程桌面连接,通常需要借助一些第三方工具或服务。以下是一个简单的步骤指南,帮助你免费快速实现内网穿透,并使用Windows远程桌面连接:
### 1. 选择合适的内网穿透工具
有很多免费的工具可以实现内网穿透,例如:
- "Ngrok"
- "ZeroTier"
- "Tailscale"
- "frp" (面向内网的穿透工具)
这里以 "Ngrok" 为例,因为它易于使用且功能强大。
### 2. 下载并安装Ngrok
1. 访问Ngrok官网:[https://ngrok.com/](https://ngrok.com/)
2. 下载适合Windows的版本。
3. 解压下载的文件到任意目录。
### 3. 获取Ngrok Token
1. 访问Ngrok Dashboard:[https://dashboard.ngrok.com/auth](https://dashboard.ngrok.com/auth)
2. 注册并登录。
3. 在左侧菜单中选择“Tokens”,然后点击“Create Authtoken”。
4. 复制生成的Authtoken。
### 4. 配置Ngrok
打开命令提示符(CMD)或PowerShell,导航到Ngrok解压目录,然后运行以下命令:
```sh
ngrok authtoken <你的Authtoken>
```
### 5. 启动内网穿透
假设你要穿透的Windows远程桌面服务运行
相关内容:
本次介绍使用 frp 实现内网穿透,文章是之前写的,写了很多篇,后续会一一整理出来,希望帮助到有需要的朋友。
frp简介
在某些时候,我们需要远程访问某个内网的资源或服务,但是内网设备通常是无法被外部访问的,内网穿透技术就是解决这种问题。
frp是开源的内网穿透工具,轻量、容易配置,而且支持多种协议(如 http、https、tcp、udp等),并且支持多种认证方式。
frp github 中文文档:
https://github.com/fatedier/frp/blob/master/README_zh.md
release 下载:
https://github.com/fatedier/frp/releases
注:服务器端和客户端下载的版本要保持一致。
本次下载的版本是【v0.31.2】:
https://github.com/fatedier/frp/releases/tag/v0.31.2
本次演示的是通过 frp 内网穿透,在远程连接一台windows电脑。
一、部署
frp由两部分组成:
- frps(服务器端):运行在具有公网 IP 的服务器上
- frpc(客户端):运行在内网设备上
本次部署的服务端是阿里云的一台 CentOS 云服务器,客户机就是本地一台 windows。
1.1 服务端部署
本次下载的文件是【
frp_0.31.2_linux_amd64.tar.gz】,frps.ini 是启动的配置文件:
bind_port = 7000
因为用到了服务器默认是 7000 端口,需要在防火墙中开启,如果是云服务器则只需要在安全组的入站方向增加一个端口即可。
由于下面客户端配置的端口是 6000 ,因此一起加上:

下载并运行服务端程序:
# 将文件上传到服务器
# 解压压缩包
tar -zxvf frp_0.31.2_linux_amd64.tar.gz
# 进入目录
cd frp_0.31.2_linux_amd64
# 设置后台运行frp服务端
nohup ./frps -c ./frps.ini &
或者输出到指定目录 nohup ./frps -c ./frps.ini > log/log_202212.log 2>&1 &
查看 nohub.out 日志:
# cat nohup.out
2020/03/24 22:48:05   frps tcp listen on 0.0.0.0:7000
2020/03/24 22:48:05   start frps success
#
说明服务端启动成功。
1.2 客户端部署
客户端是windows系统,本次下载的文件是【
frp_0.31.2_windows_386.zip】。
直接解压压缩包,修改 frpc.ini 文件:
server_addr = 111.X.X.34
server_port = 7000


type = tcp
local_ip = 127.0.0.1
local_port = 3389
remote_port = 6000
server_addr 是服务端 ip 地址。
进入解压的根目录,输入命令 frpc -c frpc.ini 启动客户端:

出现 start proxy success 说明启动成功。
windows开启远程桌面功能:

二、测试
找一台非局域网的电脑远程连接上面部署的windows电脑:
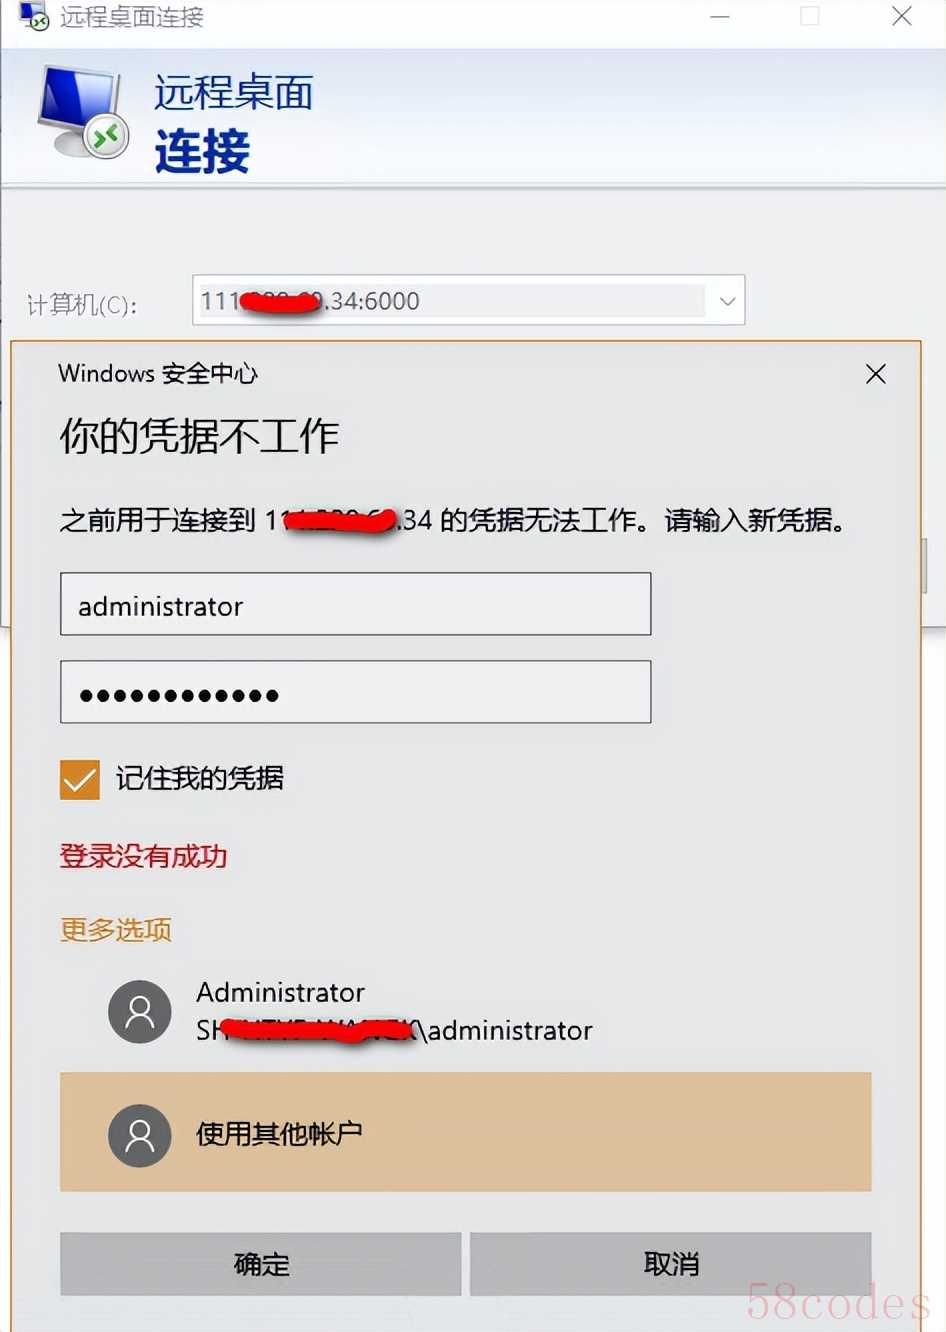
校验了用户名或密码错误,出现了这个说明连接到了,下面输入正确的用户名密码:

连接成功。
如有域名的话,可以将域名解析到这个公网服务器ip,然后通过【域名+端口】访问,这样方便记忆。
三、知识点
前面介绍的是基本使用,按照上面的步骤可以立马使用起来,但是缺乏安全性、便捷性等。
3.1 压缩包内文件介绍
压缩包有这个几个文件:
# ls
frpc  frpc_full.ini  frpc.ini  frps  frps_full.ini  frps.ini  LICENSE  systemd
- 客户端使用:frpc frpc_full.ini frpc.inifrpc:命令frpc_full.ini:配置文件完整示例frpc.ini:配置文件
- 服务端使用:frps frps_full.ini frps.inifrps:命令frps_full.ini:配置文件完整示例frps.ini:配置文件
3.2 服务端
先看下配置文件完整示例 frps_full.ini 的内容:
# cat frps_full.ini
#  is integral section

# A literal address or host name for IPv6 must be enclosed
# in square brackets, as in ":80", ":http" or ":80"
bind_addr = 0.0.0.0
bind_port = 7000

# udp port to help make udp hole to penetrate nat
bind_udp_port = 7001

# udp port used for kcp protocol, it can be same with 'bind_port'
# if not set, kcp is disabled in frps
kcp_bind_port = 7000

# specify which address proxy will listen for, default value is same with bind_addr
# proxy_bind_addr = 127.0.0.1

# if you want to support virtual host, you must set the http port for listening (optional)
# Note: http port and https port can be same with bind_port
vhost_http_port = 80
vhost_https_port = 443

# response header timeout(seconds) for vhost http server, default is 60s
# vhost_http_timeout = 60

# set dashboard_addr and dashboard_port to view dashboard of frps
# dashboard_addr's default value is same with bind_addr
# dashboard is available only if dashboard_port is set
dashboard_addr = 0.0.0.0
dashboard_port = 7500

# dashboard user and passwd for basic auth protect, if not set, both default value is admin
dashboard_user = admin
dashboard_pwd = admin

# dashboard assets directory(only for debug mode)
# assets_dir = ./static
# console or real logFile path like ./frps.log
log_file = ./frps.log

# trace, debug, info, warn, error
log_level = info

log_max_days = 3

# disable log colors when log_file is console, default is false
disable_log_color = false

# auth token
token = 12345678

# heartbeat configure, it's not recommended to modify the default value
# the default value of heartbeat_timeout is 90
# heartbeat_timeout = 90

# only allow frpc to bind ports you list, if you set nothing, there won't be any limit
allow_ports = 2000-3000,3001,3003,4000-50000

# pool_count in each proxy will change to max_pool_count if they exceed the maximum value
max_pool_count = 5

# max ports can be used for each client, default value is 0 means no limit
max_ports_per_client = 0

# if subdomain_host is not empty, you can set subdomain when type is http or https in frpc's configure file
# when subdomain is test, the host used by routing is test.frps.com
subdomain_host = frps.com

# if tcp stream multiplexing is used, default is true
tcp_mux = true

# custom 404 page for HTTP requests
# custom_404_page = /path/to/404.html


addr = 127.0.0.1:9000
path = /handler
ops = Login


addr = 127.0.0.1:9001
path = /handler
ops = NewProxy
3.2.1 启用 dashboard
改成:
bind_port = 7000
bind_udp_port = 7001
kcp_bind_port = 7000

dashboard_addr = 0.0.0.0
dashboard_port = 7500
dashboard_user = admin
dashboard_pwd = admin
3.2.2安全认证
如果别人知道了你的服务器ip和端口,别人就能使用你的服务器做穿透了:
server_addr = 111.X.X.34
server_port = 7000
为了保证安全,需要服务端和客户端添加相同的认证 token。
服务端添加如下配置后重启:
# auth token
token = wankun666
重启 frps,然后查看端口,如下已经启动成功了,我添加了很多端口:
# netstat -lnpt|grep frps
tcp6       0      0 :::11522                :::*                    LISTEN      1909/./frps
tcp6       0      0 :::6022                 :::*                    LISTEN      1909/./frps
tcp6       0      0 :::21672                :::*                    LISTEN      1909/./frps
tcp6       0      0 :::7433                 :::*                    LISTEN      1909/./frps
tcp6       0      0 :::8181                 :::*                    LISTEN      1909/./frps
tcp6       0      0 :::11672                :::*                    LISTEN      1909/./frps
tcp6       0      0 :::7000                 :::*                    LISTEN      1909/./frps
tcp6       0      0 :::9306                 :::*                    LISTEN      1909/./frps
tcp6       0      0 :::12379                :::*                    LISTEN      1909/./frps
# kill -9 1909
这个时候客户端会出现连接失败,查看最新日志,提示 authorization failed 认证失败:
# tail -10 nohup.out
2022/12/17 09:10:22    reconnect to server error: authorization failed
2022/12/17 09:10:42    try to reconnect to server...
2022/12/17 09:10:42    authorization failed
2022/12/17 09:10:42    reconnect to server error: authorization failed
2022/12/17 09:11:02    try to reconnect to server...
2022/12/17 09:11:02    authorization failed
2022/12/17 09:11:02    reconnect to server error: authorization failed
2022/12/17 09:11:22    try to reconnect to server...
2022/12/17 09:11:22    authorization failed
2022/12/17 09:11:22    reconnect to server error: authorization failed
...
服务端重新启动也会认证失败:
# ps -ef|grep frp
root     10861  5948  0 09:17 pts/0    00:00:00 grep --color=auto frp
root     20274     1  0 8月28 ?       00:37:05 ./frpc -c ./frpc.ini
# kill -9 20274
# ps -ef|grep frp
root     10947  5948  0 09:18 pts/0    00:00:00 grep --color=auto frp
# ./frpc -c frpc.ini
2022/12/17 09:19:56   authorization failed
2022/12/17 09:19:56   login to server failed: authorization failed
authorization failed
客户端再添加token配置,然后重启:
# auth token
token = wankun666!!
重启成功了:
# ./frpc -c frpc.ini
2022/12/17 09:22:25    login to server success, get run id , server udp port
2022/12/17 09:22:25    proxy added:
2022/12/17 09:22:25     start proxy success
2022/12/17 09:22:25     start proxy success
2022/12/17 09:22:25     start proxy success
2022/12/17 09:22:25     start proxy success
2022/12/17 09:22:25     start proxy success
2022/12/17 09:22:25     start proxy success
2022/12/17 09:22:25     start proxy success
2022/12/17 09:22:25     start proxy success
由于当前窗口关闭之后,程序就结束了,最后使用命令让其后台运行 nohup ./frpc -c ./frpc.ini &。
总结
本次介绍了下载安装frp服务端和客户端,配置实现了windows远程桌面连接,后续会介绍其他内容,欢迎关注我,不错过,不迷路。
(完)
 微信扫一扫打赏
 支付宝扫一扫打赏
