基于LangGraph实现Claude的过程可以分为以下几个步骤:
1. "安装LangGraph库":
首先,确保你已经安装了LangGraph库。如果还没有安装,可以使用pip进行安装:
```bash
pip install langgraph
```
2. "创建Claude模型":
Claude是一个基于Transformer的预训练语言模型,你可以使用Hugging Face的Transformers库来加载和使用Claude模型。首先,安装Transformers库:
```bash
pip install transformers
```
然后,创建一个函数来加载和使用Claude模型:
```python
from transformers import AutoModelForCausalLM, AutoTokenizer
def load_claude_model():
tokenizer = AutoTokenizer.from_pretrained("HuggingFace/claude")
model = AutoModelForCausalLM.from_pretrained("HuggingFace/claude")
return tokenizer, model
```
3. "定义LangGraph节点":
LangGraph允许你定义多个节点,每个节点可以是一个函数或一个任务。在这个例子中,我们定义一个节点来处理文本生成任务:
```python
def generate_text(node_input, tokenizer, model):
input_ids = tokenizer.encode(node_input, return_tensors="pt")
outputs = model.generate(input_ids, max_length=50)
return tokenizer.decode(outputs[0], skip_special_tokens=True)
```
4. "创建LangGraph图"
相关内容:
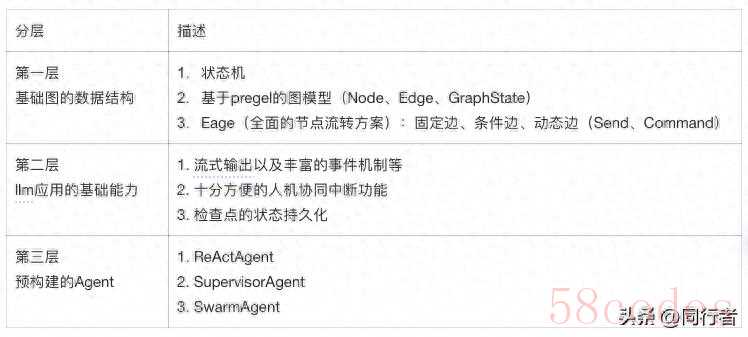
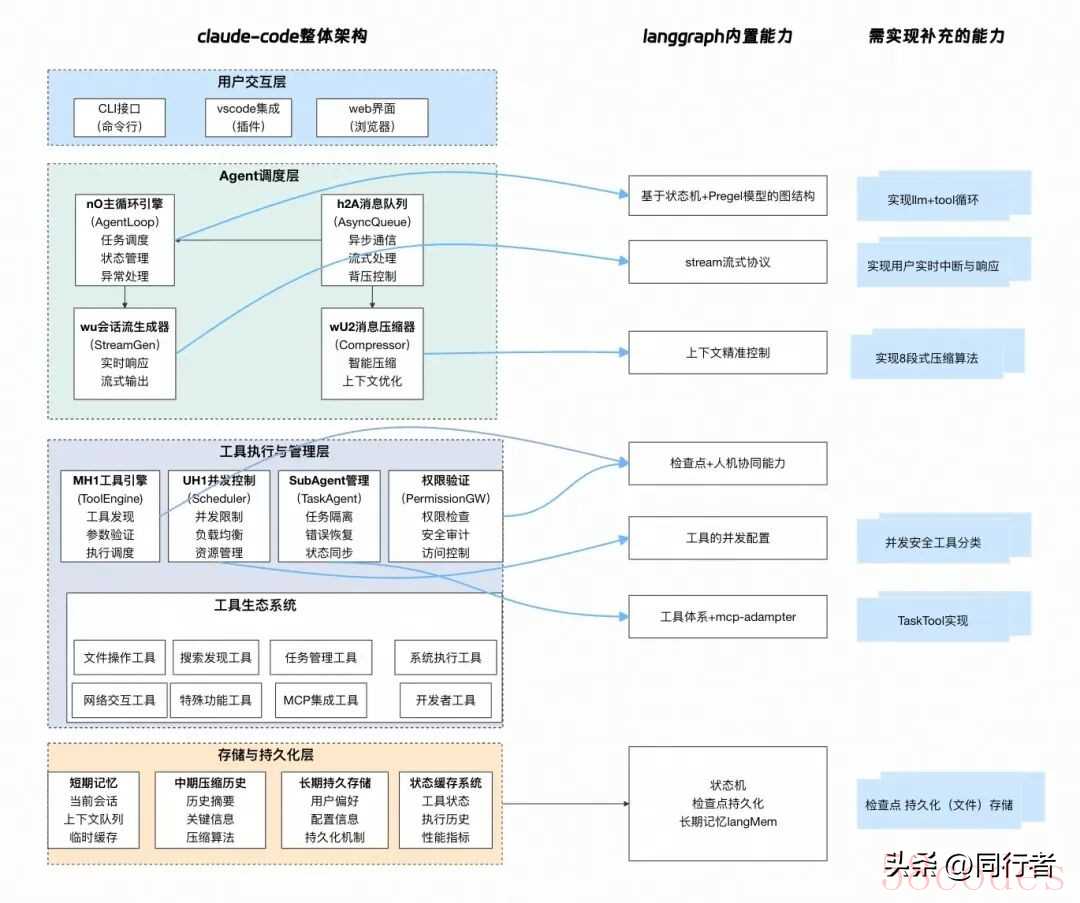
2.了解并实践langgraph,构建简版claude-codelanggraph是当下最流行的agent应用框架(之一),提供了丰富的llm应用相关能力,同时也有很多新的概念,可以实践一下,我觉得最核心需要关心的是 状态机State、图节点workflow、工具Tool 三个方面。所以下文在每个功能实现上会围绕这三个方面进行设计改动。期望通过本文的实践可以对claude-code的核心设计以及langgraph框架有一个初步的了解。如何一步步从最初的简单ReActAgent升级到一个简版的claude-code agent。开工前的背景介绍1.claude-code的逆向工程claude-code是anthropic公司出的一款cli工具,最近相当火,实际体验下来也很不错,个人认为是目前Code Agent领域的最佳实践。那么好学的程序员肯定会很好奇背后的实现原理。1.https://github.com/shareAI-lab/analysis_claude_code2.https://github.com/Yuyz0112/claude-code-reverse以上两个仓库对claude-code进行了全面的逆向分析,把相关逆向的提示词也开源了,我们完全可以通过这份repo来了解claude-code的核心实现。当然,这俩仓库的提示词信息量巨大,在llm逆向的过程中也会出现幻觉(确实会有一些前后矛盾的地方),整体还是不能无脑阅读,下面会结合这些分析以及个人的理解捋一遍核心实现。2.langgraph介绍langgraph是目前大模型应用开发最流行的框架之一,langchain衍生出的框架,专注于智能体应用的开发。详细的介绍可以参见langgraph官网:https://langchain-ai.github.io/langgraphjs/这里根据我的理解简要概括一下主要功能:
 其中langgraph官方最引以为豪的两个特性:
- 实现偏底层,上层无过多抽象,用户可精准控制大模型的输入,这对llm上下文优化至关重要。
- 规则驱动和llm驱动相融合,可以在大模型的自主性和不确定性中间寻找平衡,让我们的系统具备较高的可靠性、可观测性。
 langgraph版ClaudeCode实现1.梦开始的地方:最基础的ReActAgent先从一个最简单的ReactAgent,来了解langgraph最基本的graph相关的操作。
const agentState = Annotation.Root({
  messages: Annotation<BaseMessage>({
    reducer: safeMessagesStateReducer,
    default: () => ,
  })
});


const toolNodeForGraph = new ToolNode(tools)


const shouldContinue = (state: typeof agentState.State) => {
  const { messages } = state;
  const lastMessage = messages;
  if ("tool_calls" in lastMessage && Array.isArray(lastMessage.tool_calls) && lastMessage.tool_calls?.length) {
      return"tools";
  }
  return END;
}


const callModel = async (state: typeof agentState.State) => {
  const { messages } = state;
  const response = await modelWithTools.invoke(messages);
  return { messages: response };
}


const workflow = new StateGraph(agentState)
  .addNode("llm", callModel)
  .addNode("tools", toolNodeForGraph)
  .addEdge(START, "llm")
  .addConditionalEdges("llm", shouldContinue, )
  .addEdge("tools", "llm");


const agent = workflow.compile()const config = {
configurable: { thread_id: this.sessionId },
streamMode: ,
version: 'v2' as const,
}
const stream = agent.streamEvents({messages: }, config);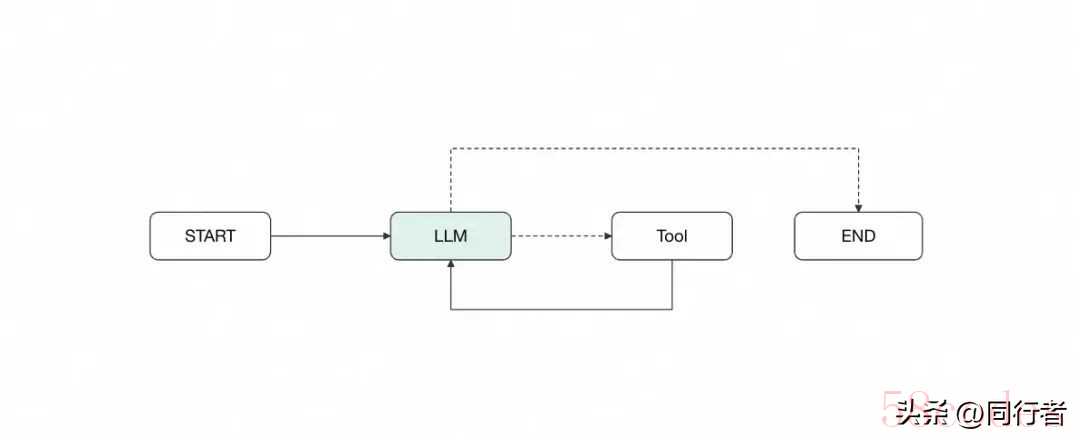 当然实际上,langgraph官方也提供了预构建的reactAgent,后续我们直接使用即可。我们将从这个图出发,一步步实现langClaudeCode。2.人在环路:中断审查以及ckpt持久化在使用claude-code的时候,如果需要查看or编辑某个文件,会询问用户权限,这其实是一种人工协同的方式。为了实现类似的功能,我们需要在原有的workflow基础上添加一个人工审查节点:
// 添加人工审查节点的workflow
const workflowWithReview = new StateGraph(MessagesAnnotation)
  .addNode("agent", callModel)
  .addNode("tools", toolNodeForGraph)
  .addNode("human_review", humanReviewNode)  // 新增:人工审查节点
  .addEdge(START, "agent")
  .addConditionalEdges("agent", shouldContinueWithReview, )  // 修改:路由到审查节点
  .addConditionalEdges("human_review", checkUserApproval, )  // 新增:审查结果路由
  .addEdge("tools", "agent");
2.1 人工审查节点实现
添加的human_review节点主要负责以下功能:1.中断执行流程:在工具调用前暂停,等待用户决策;2.提供操作选项:给用户提供批准、拒绝、修改等选项;3.中断恢复:根据用户的回复决定是否下一个节点。// 人工审查节点的具体实现
const humanReviewNode = async (state: typeof MessagesAnnotation.State) => {
const lastMessage = state.messages;
const humanAnswer = interrupt("确认是否执行");
if(humanAnswer === "同意"){
returnnew Command({
goto: "tool",
update: {
messages:
}
})
}
if(humanAnswer === "拒绝"){
returnnew Command({
goto: "agent",
update: {
messages:
}
})
}
};2.2 由大模型驱动决策是否需要人机协同
上面的人机协同节点是硬编码在图中,实际大模型应用开发的时候,人工协同的场景非常多(比如llm需求询问用户需求细节、需要用户确认规划等等),其实我们可以利用工具的特性(指模型根据提示词来驱动),让大模型自主决策是否需要人工协同。我们添加一个人工协同工具。function createHumanLoopTool(){
const executor = (arg, config) => {
const msgs: BaseMessage = ;
const state = getCurrentTaskInput();
returnnew Command({
goto: 'askHuman',
graph: Command.PARENT,
update: {
messages: state.messages.concat(msgs),
},
});
};
return tool(executor, {
name: 'ashHuman',
description: '当需要向用户确认需求、询问补充信息、向用户提问时, 务必调用此工具',
schema,
});
}2.3 检查点持久化支持
到目前为之,我们已经成功实现了cc的人工协同功能(当然cc中人机协同的核心目的是工具权限校验),并且更强大。但cc是单机的,实际生产环境都是多个机器,在一次中断后,下一次请求可能会命中别的机器,检查点也就不存在,所以需要支持检查点持久化,这一点langgraph也提供了很成熟的解决方案。import { MemorySaver } from "@langchain/langgraph";
const app = workflow.compile({
checkpointer: new MemorySaver(), // 状态持久化
});
// 使用示例
const config = { configurable: { thread_id: "review-session-1" } };
await app.invoke(initialState, config);
// 在用户审查后继续执行
await app.invoke(null, config); // 从中断点继续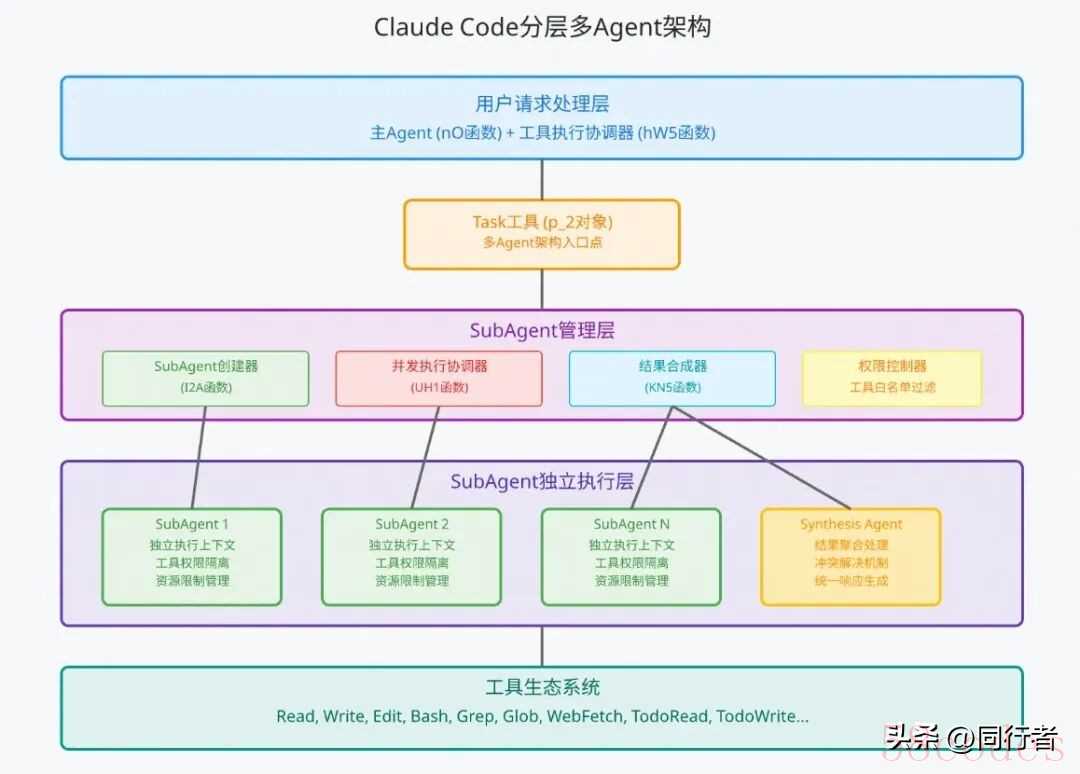 claude code 的多agent架构如图所示,整个流程如下:
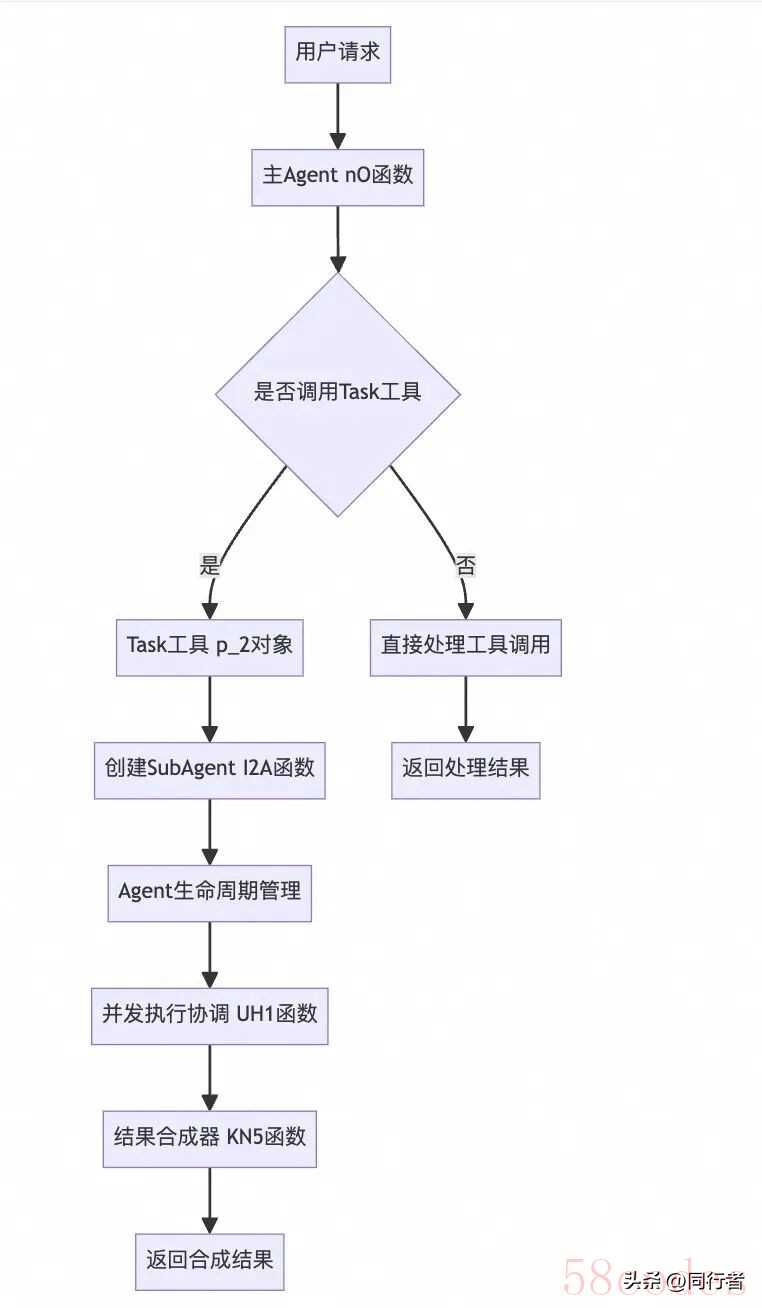 研究SubAgent的实现机制,我们从下面几个方面逐一研究,SubAgent创建流程、执行上下文分析、并发执行协调分析。核心技术特点:1.通过TaskTool根据任务复杂度创建SubAgent2.完全隔离的执行环境:每个SubAgent在独立上下文中运行3.智能并发调度:支持多Agent并发执行,动态负载均衡4.安全权限控制:细粒度的工具权限管理和资源限制5.结果合成:智能的多Agent结果聚合和冲突解决3.2cc核心函数实现以下是分析逆向仓库后,我认为最核心的一些函数,可以通过这些函数对流程有一个比较清晰的了解。(1)Task工具作为多Agent架构入口点Task工具 - 多Agent架构入口点
// Task工具对象结构 (p_2)
p_2 = {
    name: "Task",
    async call({ prompt }, context, globalConfig, parentMessage) {
        // 核心:通过Task工具内部创建和管理SubAgent
        if (config.parallelTasksCount > 1) {
            // 多Agent并发执行模式
            const agentTasks = Array(config.parallelTasksCount)
                .fill(`${prompt}

Provide a thorough and complete analysis.`)
                .map((taskPrompt, index) => I2A(taskPrompt, index, executionContext, parentMessage, globalConfig));
        } else {
            // 单Agent执行模式
        }
    }
}
// SubAgent启动函数
async function* I2A(taskPrompt, agentIndex, parentContext, globalConfig, options = {}){
    // 1. 生成唯一Agent ID
    const agentId = VN5();

    // 2. 创建隔离的执行上下文
    const executionContext = {
        abortController: parentContext.abortController,
        options: { ...parentContext.options },
        getToolPermissionContext: parentContext.getToolPermissionContext,
        readFileState: parentContext.readFileState,
        setInProgressToolUseIDs: parentContext.setInProgressToolUseIDs,
        tools: parentContext.tools.filter(tool => tool.name !== "Task") // 防止递归
    };

    // 3. 执行主Agent循环
    forawait(let agentResponse of nO(/* 主Agent循环 */)){
        // 处理Agent响应和工具调用
    }

    // 4. 返回最终结果
    yield { type: "result", data: { /* 结果数据 */ } };
}// 并发执行调度器
async function* UH1(generators, maxConcurrency = Infinity){
const wrapGenerator = (generator) => {
const promise = generator.next().then(({ done, value }) => ({
done, value, generator, promise
}));
return promise;
};
const remainingGenerators = ;
const activePromises = new Set();
// 启动初始并发任务
while (activePromises.size < maxConcurrency && remainingGenerators.length > 0) {
const generator = remainingGenerators.shift();
activePromises.add(wrapGenerator(generator));
}
// 并发执行循环
while (activePromises.size > 0) {
const { done, value, generator, promise } = await Promise.race(activePromises);
activePromises.delete(promise);
if (!done) {
activePromises.add(wrapGenerator(generator));
if (value !== undefined) yield value;
} elseif (remainingGenerators.length > 0) {
const nextGenerator = remainingGenerators.shift();
activePromises.add(wrapGenerator(nextGenerator));
}
}
}// 多Agent结果合成器
function KN5(originalTask, agentResults){
const sortedResults = agentResults.sort((a, b) => a.agentIndex - b.agentIndex);
const agentResponses = sortedResults.map((result, index) => {
const textContent = result.content
.filter(content => content.type === "text")
.map(content => content.text)
.join("
");
return `== AGENT ${index + 1} RESPONSE ==
${textContent}`;
}).join("
");
return `Original task: ${originalTask}
I've assigned multiple agents to tackle this task. Each agent has analyzed the problem and provided their findings.
${agentResponses}
Based on all the information provided by these agents, synthesize a comprehensive and cohesive response...`;
}function createTaskTool(baseTools: any, model: any, subAgentConfigs: SubAgentConfig){
return tool(
async (args: { description: string; subagent_type: string }, config) => {
// 具体工具内部实现,下文重点介绍
},
{
name: "TaskTool",
description: `Launch specialized SubAgents to autonomously handle complex multi-step tasks.
Available Agent types:
- general-purpose: General agent suitable forcomplex queries, file searches, and multi-step task execution (Tools: *)
- code-analyzer: Code analysis expert for code review, architecture analysis, performance optimization
- document-writer: Documentation expert for technical docs, user manuals, API documentation
Usage rules:
1. Use this tool when tasks are complexand require specialized handling
2. Each SubAgent invocation is independent and stateless
3. Provide detailed task descriptions; SubAgents will complete autonomously
4. After SubAgent completion, summarize key information for the user
When to use SubAgents:
- Complex multi-step analysis tasks
- Tasks requiring specialized skills (code analysis, documentation)
- Large-scale file search and processing
- Independent tasks that can be processed in parallel`,
schema: z.object({
description: z.string().describe("Detailed task description for the SubAgent"),
subagent_type: z.enum().describe("SubAgent type to use")
})
}
);
}function createTaskTool(baseTools: any, model: any, subAgentConfigs: SubAgentConfig){
// 为每种类型创建专门的ReActAgent实例
const agentInstances = new Map<string, any>();
// 初始化预定义的SubAgent类型
subAgentConfigs.forEach(config => {
const filteredTools = config.allowedTools
? baseTools.filter(tool => config.allowedTools.includes(tool.name))
: baseTools.filter(tool => tool.name !== "TaskTool"); // 防止递归
agentInstances.set(config.type, createReactAgent({
llm: model,
tools: filteredTools,
systemMessage: config.systemPrompt
}));
});
return tool(
async (args: { description: string; subagent_type: string }, config) => {
const { description, subagent_type } = args;
// 获取指定类型的Agent
const agent = agentInstances.get(subagent_type);
if (!agent) {
thrownew Error(`Unknown SubAgent type: ${subagent_type}`);
}
// 执行SubAgent
try {
console.log(` Launching SubAgent : ${description}`);
// 创建隔离的执行上下文
const subAgentState = {
messages:
};
// 执行Agent并获取结果
const result = await agent.invoke(subAgentState);
// 提取最终响应
const finalMessage = result.messages;
const responseContent = finalMessage.content;
console.log(`✅ SubAgent completed`);
// 返回格式化结果 - 模拟claude-code的结果格式
return `SubAgent execution completed:
Task: ${description}
Result:
${responseContent}
Note: This result was generated by a specialized SubAgent. Please summarize key information for the user as needed.`;
} catch (error) {
console.error(`❌ SubAgent failed:`, error);
return `SubAgent execution failed: ${error.message}`;
}
},
{
name: "TaskTool",
description: `提示词 略过`,
schema: z.object({
description: z.string().describe("Detailed task description for the SubAgent"),
subagentType: z.enum().describe("SubAgent type to use")
})
}
);
}// SubAgent配置定义
const subAgentConfigs: SubAgentConfig =
},
{
type: "document-writer",
systemPrompt: `You are a technical writing expert focused on:
- Clear and accurate technical documentation
- User-friendly operation guides
- Complete API documentation and examples
- Structured project documentation
Ensure readability and practicality of documentation`,
allowedTools:
}
]; 微信扫一扫打赏
 支付宝扫一扫打赏
