React is a JavaScript library for building user interfaces, primarily used for single-page applications. It was created by Facebook and is maintained by them along with a community of individual developers and companies. React allows developers to create large web applications that can change data, without reloading the page. It is an open-source project and has a large ecosystem of tools and libraries.
Key features of React include:
1. "Component-Based Architecture": React allows developers to build encapsulated components that manage their own state, then compose them to make complex UIs. Components are reusable and can be nested.
2. "JSX": React uses JSX, a syntax extension that looks similar to HTML and allows you to write HTML-like structures in your JavaScript code. It makes it easier to write and understand the UI code.
3. "Virtual DOM": React creates a virtual representation of the DOM in memory and then updates and renders the necessary changes to the actual DOM. This makes React applications more efficient and faster.
4. "One-Way Data Binding": React follows a unidirectional data flow, which means data flows in a single direction from parent to child components. This makes it easier to understand how data changes are propagated through the application.
5. "Strong Community and Ecosystem": React has a large and active community, which contributes to a rich ecosystem of libraries and tools. This includes state management libraries like Redux and MobX, routing libraries like React Router, and many more.
6. "Server-Side Rendering
相关内容:
前言
大家都知道Android端的React Native可以运行时修改server host,开发模式下摇一摇设备,呼出调试菜单,就可以修改server host,不需要重新打包很方便。不知道为什么,iOS环境缺没有提供相关功能。
于是这个工具就出来了:
react-native-debug-server-host
如何使用
使用方式简单的不能再简单了,只要把DebugServerHost整个目录引用到xcode工程中,恭喜你,你已经安装完毕。
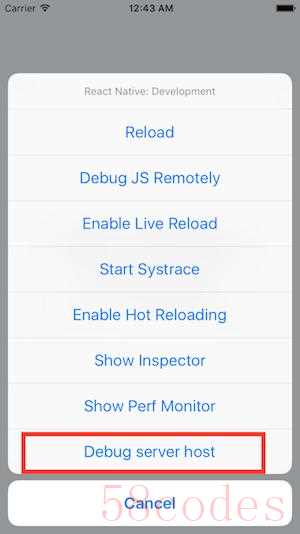
运行一下,看你的调试菜单是不是多了一项:
修改server host可以通过手工输入,也就是直接在文本框中手工打字,原则上不建议这么做,太虐心了。因为提供了更方便的修改途径:扫描二维码。
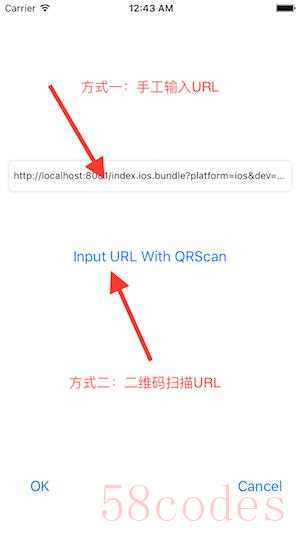
具体操作步骤:
将服务器地址通过二维码生成工具,生成二维码。
点击
Input URL With QRScan,打开扫一扫工具,扫描二维码。点击
OK,会自动执行reload动作。
很方便是吧。集成和使用说完了,下面说下具体实现。只关心使用的朋友就不用继续往下看了。
该库中使用了二维码扫描库
QRCodeReaderViewController
实现原理
调试菜单的实现在RCTDevMenu这个类中,每次打开调试菜单时,都会调用menuItems这个方法,它是用来创建菜单选项的,所以我们要添加自己的调试菜单,只需要在末尾追加就可以了。
考虑到react native更新频率较快,并且直接修改源码的方式不太科学,因此创建RCTDevMenu的分类,添加自定义菜单,然后使用swizzling技术替换原有方法。swizzling在react native工具类RCTUtils中已经实现。
@implementation RCTDevMenu (serverAddr)
- (NSArray *)newMenuItems {
  NSMutableArray *items = (NSMutableArray *);
  RCTDevMenuItem *item =  postNotificationName:ChangeServerAddrNotification
 object:nil
 userInfo:nil];
}];

    ;
     return items;
}
@end可以看到,我们添加了一项菜单Debug server host,处理hander发送了一个通知,用来告知处理类打开UI面板,让用户设置server host。
- (void)changeServerAddr:(NSNotification *)notification {
  dispatch_after(dispatch_time(DISPATCH_TIME_NOW, (int64_t)(1 * NSEC_PER_SEC)), dispatch_get_main_queue, ^{
    .keyWindow.rootViewController presentViewController:_serverAddrviewController animated:YES completion:^{
      NSLog(@"");
    }];
  });
}
到这里,已经实现了调试菜单,并让用户修改server host选项。下一步,就要告知RCTBridge新的server host,因为加载的动作是RCTBridge执行的。
RCTBridge有个RCTBridgeDelegate,用来告知server host是哪个,所以只要实现该协议,并指定RCTBridge的具体delegate即可。
//修改RCTBridge的delegate为自定义对象
- (void)setBridge:(RCTBridge *)bridge {
  _bridge = bridge;  if (]) {
    RCTBatchedBridge *batched = (RCTBatchedBridge *)_bridge;
    ;
  } else {
    ;
  }
}
//为简单起见,server host传递放在全局配置文件中
- (NSURL *)sourceURLForBridge:(RCTBridge *)bridge {
NSURL *serverUrl = nil;
NSString *url = objectForKey:@"RCT_SERVER_ADDR_URL"];
if (url != nil && url.length > 1) {
serverUrl = ;
}
return serverUrl;
}核心实现基本就差不多了,剩下没什么好说的,有兴趣直接看源码吧。
如果有帮助到你就给颗星吧。
 微信扫一扫打赏
 支付宝扫一扫打赏
